Trong bài viết này, chúng ta sẽ tìm hiểu cách install MySQL 5.7 Ubuntu 22.04 LTS bằng dòng lệnh, tạo người dùng mới và kích hoạt truy cập từ xa trong MySQL 5.7.
Tải xuống kho lưu trữ MySQL bằng cách thực hiện lệnh sau:
Cập nhật gói hệ thống:
sudo apt update
Chúng ta cần cài đặt wget bằng lệnh dưới đây:
sudo apt install wget -y
Tải về kho lưu trữ bằng lệnh dưới đây:
wget https://dev.mysql.com/get/mysql-apt-config_0.8.12-1_all.deb
Sau khi tải về, cài đặt kho lưu trữ bằng lệnh dưới đây:
sudo dpkg -i mysql-apt-config_0.8.12-1_all.deb
Trong cửa sổ thoại, chọn Ubuntu Bionic và nhấp vào OK.

Hộp thoại tiếp theo sẽ hiển thị MySQL 8.0 được chọn mặc định. Chọn tùy chọn đầu tiên và nhấp vào OK.

Trong hộp thoại tiếp theo, chọn máy chủ MySQL 5.7 và nhấp vào OK.

Hộp thoại tiếp theo đã mặc định chọn MySQL 5.7. Tiếp đến, chọn mục cuối cùng "Ok" và nhấp vào OK.

Cập nhật gói hệ thống của bạn:
sudo apt-get update
Hãy tìm kiếm MySQL 5.7 bằng lệnh dưới đây:
sudo apt-cache policy mysql-server
Trước khi cài đặt MySQL 5.7, bạn cần chạy lệnh sau:
sudo apt-key adv --keyserver keyserver.ubuntu.com --recv-keys 467B942D3A79BD29
sudo apt update
Chúng ta sẽ cài đặt MySQL 5.7 client và MySQL 5.7 server bằng lệnh dưới đây:
sudo apt install -f mysql-client=5.7* mysql-community-server=5.7* mysql-server=5.7*
Nhấn phím y để bắt đầu quá trình cài đặt MySQL 5.7 trên Ubuntu 22.04 LTS.
Nhập và nhập lại mật khẩu root:

Chạy các lệnh sau:
sudo mysql_secure_installation
Nhập mật khẩu root đã thiết lập ở trên và bạn sẽ có kết quả như sau:
ubuntu@ip-172-31-44-141:~$ sudo mysql_secure_installation

Securing the MySQL server deployment.

Enter password for user root:

VALIDATE PASSWORD PLUGIN can be used to test passwords
and improve security. It checks the strength of password
and allows the users to set only those passwords which are
secure enough. Would you like to setup VALIDATE PASSWORD plugin?

Press y|Y for Yes, any other key for No: y

There are three levels of password validation policy:

LOW Length >= 8
MEDIUM Length >= 8, numeric, mixed case, and special characters
STRONG Length >= 8, numeric, mixed case, special characters and dictionary file

Please enter 0 = LOW, 1 = MEDIUM and 2 = STRONG: 1
Using existing password for root.

Estimated strength of the password: 25
Change the password for root ? ((Press y|Y for Yes, any other key for No) : no

... skipping.
By default, a MySQL installation has an anonymous user,
allowing anyone to log into MySQL without having to have
a user account created for them. This is intended only for
testing, and to make the installation go a bit smoother.
You should remove them before moving into a production
environment.

Remove anonymous users? (Press y|Y for Yes, any other key for No) : y
Success.


Normally, root should only be allowed to connect from
'localhost'. This ensures that someone cannot guess at
the root password from the network.

Disallow root login remotely? (Press y|Y for Yes, any other key for No) : y
Success.

By default, MySQL comes with a database named 'test' that
anyone can access. This is also intended only for testing,
and should be removed before moving into a production
environment.


Remove test database and access to it? (Press y|Y for Yes, any other key for No) : y
- Dropping test database...
Success.

- Removing privileges on test database...
Success.

Reloading the privilege tables will ensure that all changes
made so far will take effect immediately.

Reload privilege tables now? (Press y|Y for Yes, any other key for No) : y
Success.

All done!
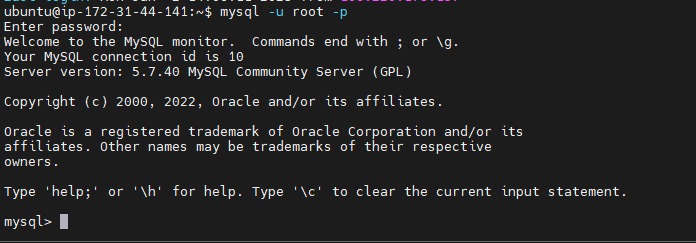
Để xác nhận phiên bản đã cài đặt, đăng nhập vào MySQL 5.7 Server bằng lệnh dưới đây.
mysql -u root -p

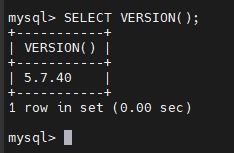
Kiểm tra phiên bản bằng lệnh dưới đây:

Ở đây, chúng ta đã bao gồm cách cài đặt MySQL 5.7 trên Ubuntu 22.04 LTS.
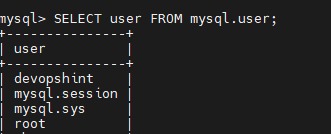
Hãy tạo người dùng bằng lệnh dưới đây:
CREATE USER 'devopshint'@'%' IDENTIFIED BY 'Devops@123';

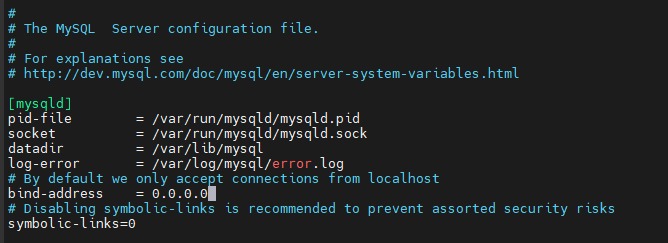
Theo mặc định, trong máy chủ cơ sở dữ liệu MySQL, truy cập từ xa bị tắt vì lý do bảo mật. Để kích hoạt kết nối từ xa của MySQL Server, chúng ta phải thay đổi bind-address trong tệp cấu hình MySQL.
Mở tệp /etc/mysql/mysql.conf.d/mysqld.cnf
sudo nano /etc/mysql/mysql.conf.d/mysqld.cnf

Lưu tệp và khởi động lại MySQL.
sudo systemctl restart mysql

Để khởi động lại, dừng và kiểm tra trạng thái, chạy các lệnh dưới đây:
sudo systemctl restart mysql
sudo systemctl stop mysql
sudo systemctl status mysql
Trong bài viết này, chúng ta đã thực hiện xong cách cài đặt MySQL 5.7 trên hệ thống Ubuntu 22.04 LTS, tạo người dùng mới và kích hoạt truy cập từ xa trong MySQL 5.7.
Mọi người cùng tìm kiếm: install mysql ubuntu 22.04, mysql 5.7, install mysql 5.7 ubuntu 22.04, cài đặt mysql trên ubuntu, install mysql 5.7 on ubuntu 22.04, install mysql ubuntu, cài mysql ubuntu, mysql 5.7 ubuntu 22.04, how to install mysql 5.7 on ubuntu 22.04, ubuntu 22.04 install mysql 5.7, install mysql server 5.7 ubuntu 22.04
Tips: Tham gia Channel Telegram KDATA để không bỏ sót khuyến mãi hot nào